
In a previous article (Internet of things), we looked into how to make a Web Controlled Mobile Home Surveillance rover. In this article, we will look into how to optimize the previous rover in every ways possible.
Disadvantages of Rover V1
1) The cost of building the rover was exorbitant. There were many circuits involved which could have been avoided.
2) There was an additional cost involved and this was the power cost. In order to power these circuits, many power supplies were required because every circuit had different voltage and current requirements.
3) Another factor was that the HTML used to control the rover was coded without AJAX which meant every command required whole page load. This caused many requests to the Rover to be skipped as the Wifi shield was not able to handle it and controlling the rover was very difficult.
4) As the eye of the rover was through Raspberry Pi camera and control was through Arduino, the viewfinder and control page were different and hence navigating the rover was difficult.
Advantages of Rover V2
1) The cost of building the rover was brought down as instead of 4 boards (i.e. Arduino UNO, Arduino Wifi shield, Arduino Motor shield and Raspberry Pi), only 2 boards sufficed (i.e. Arduino YUN and Arduino Motor shield).
2) Power cost has been reduced as only 2 boards have to be powered.
3) Controlling the Rover has become very smooth as AJAX requests are very efficient and the YUN handles these very efficiently.
4) The viewfinder and Controls are on the same page using iframes.
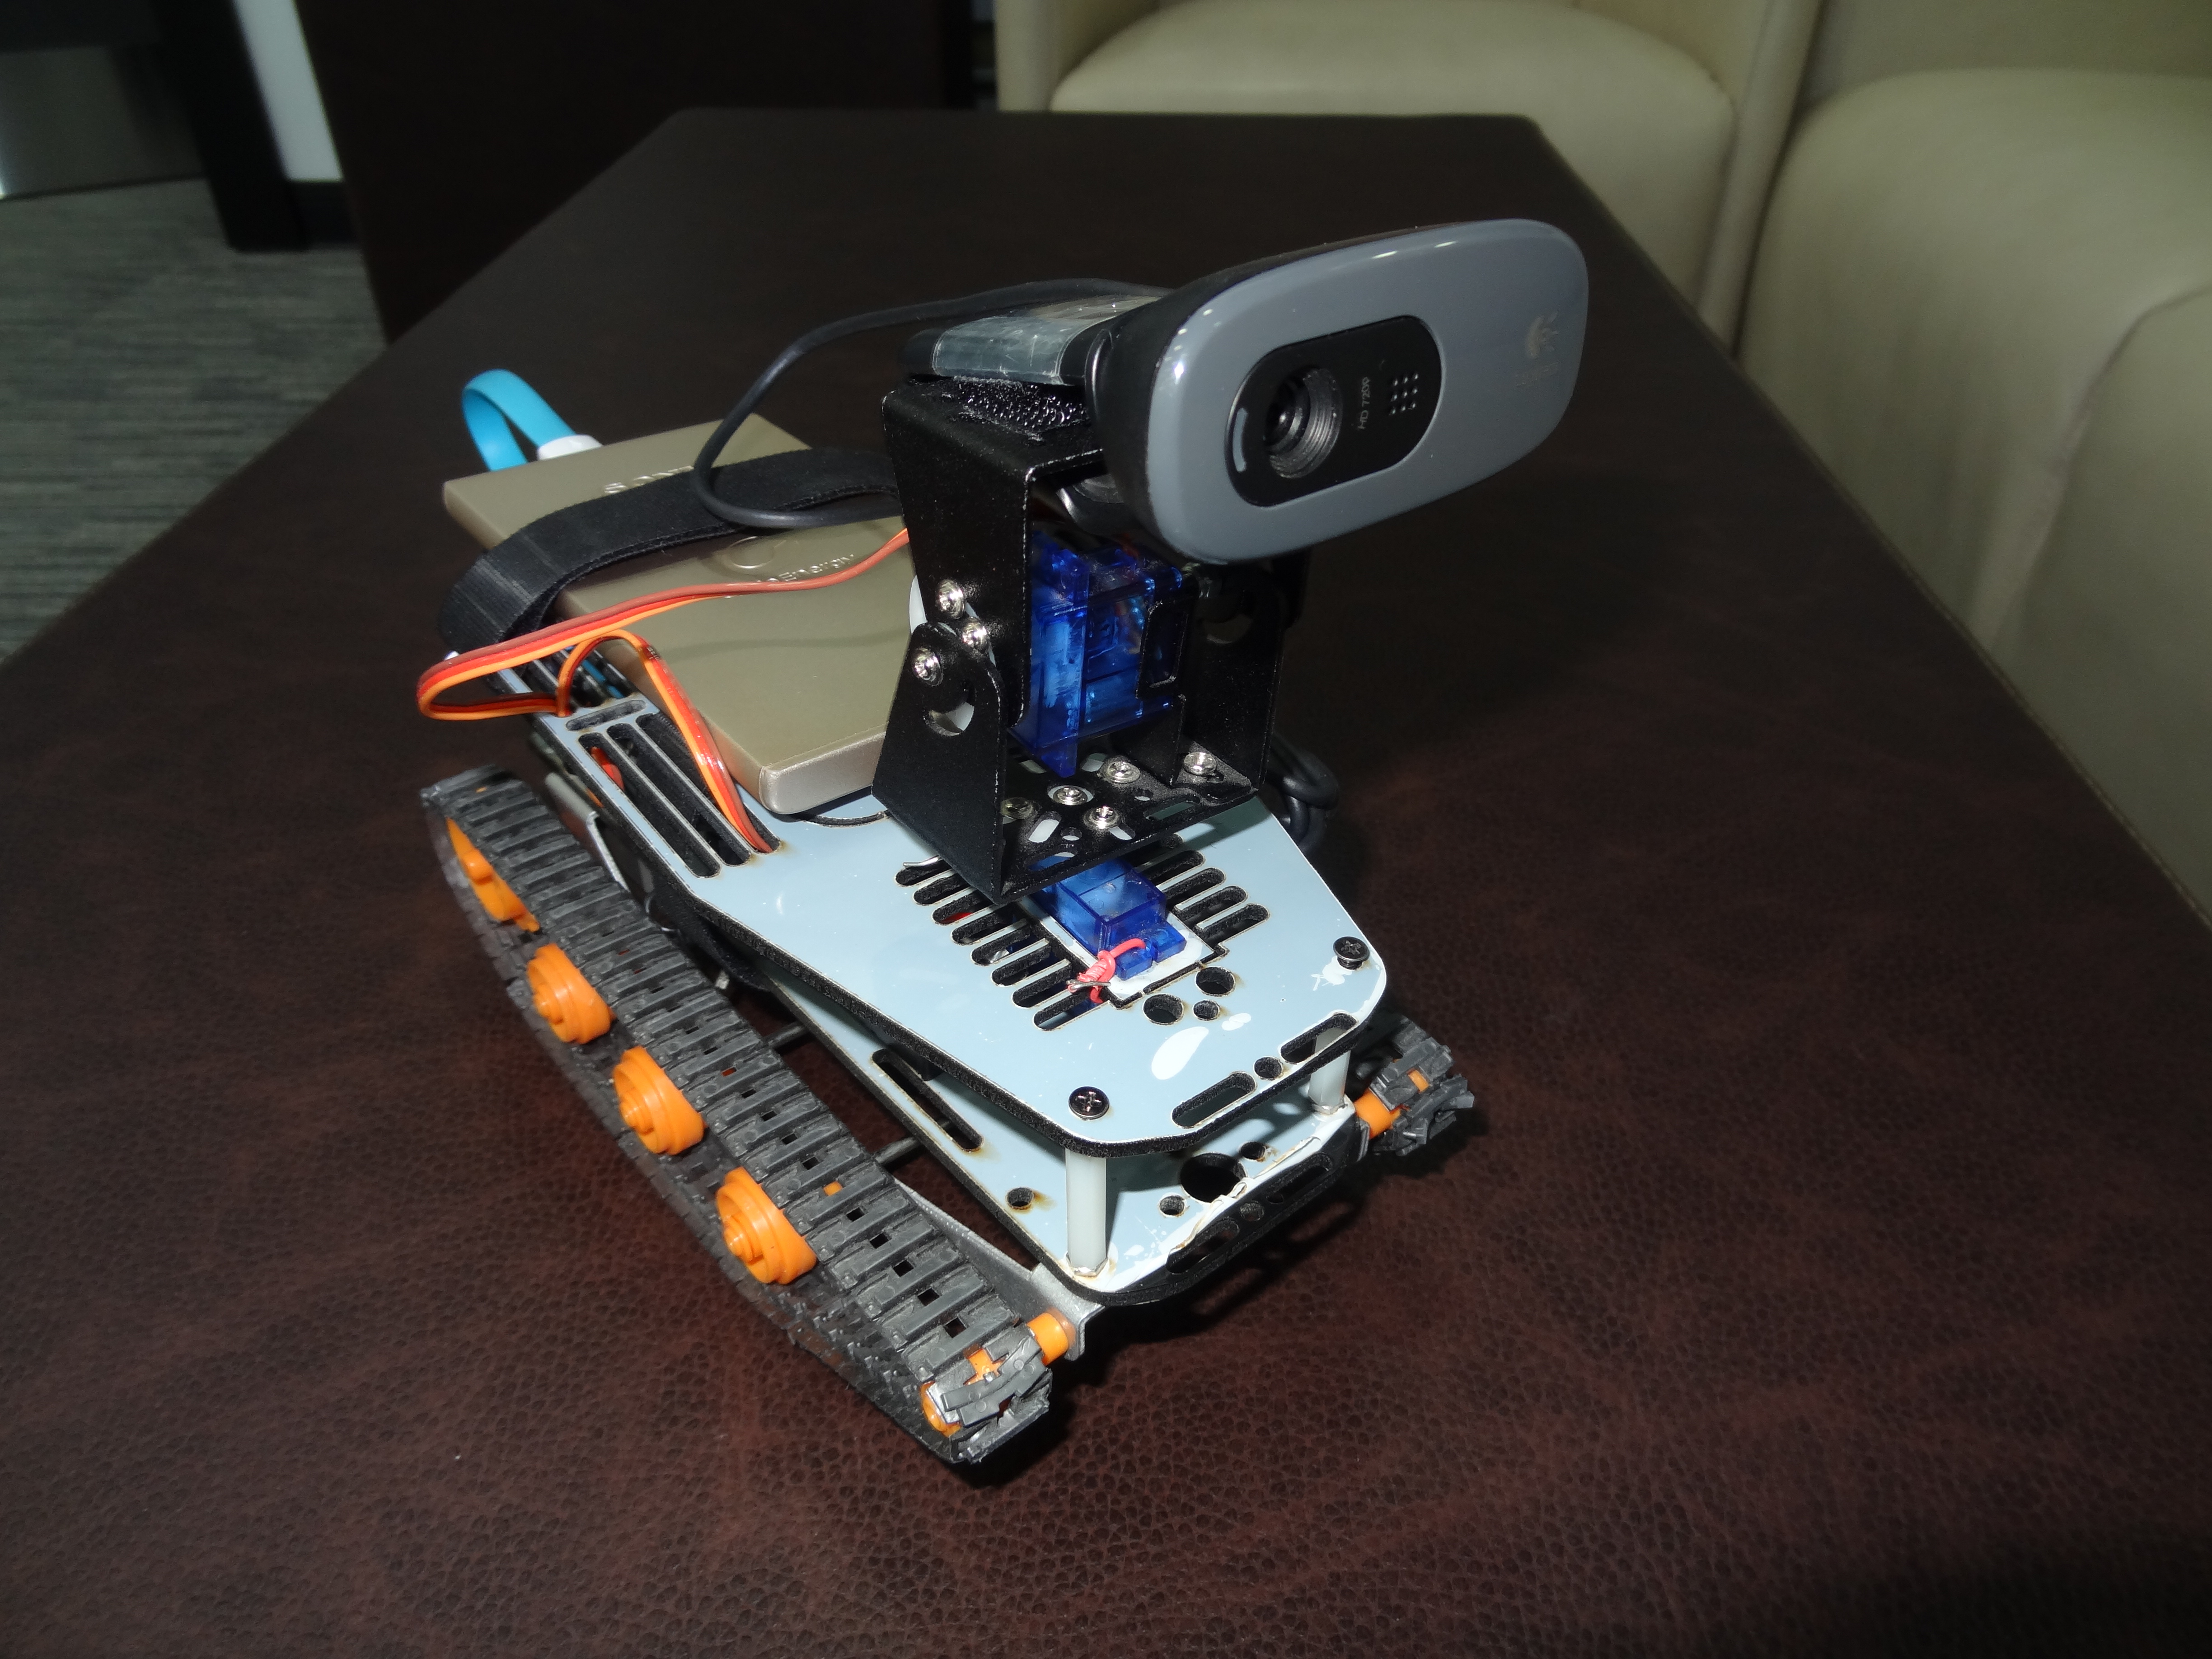
Components Used
For Body
DFRobotShop Rover Chassis Kit
This forms the basis of the vehicle. The kit includes Tamiya Twin Motor Gear Box (Kit), Tamiya Track and Wheel Set, DFRobotShop Rover Lexan Plate, Metal Brackets, Mounting hardware and a couple of motors. The problem with these motors are that the optimum voltage required by them is pretty low at around 1-1.5V. So if you drive it continuously at higher voltages, it will spoil the motors. Buy the kit here for USD 39.43.
DFRobotShop Rover Expansion Plate
This component goes on top of the Chassis Kit and can be used to mount additional hardware. Since there are so many components, it is better to have it although I must say it is expensive. Buy here for USD 20.39.
Brushed DC Motor 6V, 11500rpm
I used these motors as the Arduino Motor shield is driven by 7.2V (6×1.2V batteries) and thus 6V is closest to it. Also, the motors have the same form factor as the included motors, so it fits perfectly into the Gearbox. Buy here for USD 1.79.
For Brain
Arduino YUN

This component forms the brain of the whole project. This is what controls the speed, direction, brakes, etc. of the rover. Also, this is used to control the Pan Tilt mechanism for the camera. Since a YUN has linux on it, we can connect a USB Webcam for our viewfinder. It has built-in Wifi which eliminates the need for a Wifi shield. You should be able to procure this item locally as it is very common amongst kids and college students.
Arduino Motor Shield
This is the power behind the motors without which you cannot power and control the motors as the current requirement is high and which the Arduino cannot natively provide. It can control 2 independent DC motors. You can get it online here for around USD 30.
For Eyes
The best thing about using the Arduino YUN is the Linux it is running. Also, there is a USB port on it on which we can connect USB peripherals. Using an ordinary webcam which supports UVC, we can give eyes to our project. In this project I have used logitech HD Webcam C270.

Logitech HD Webcam C270
You can refer to the Arduino site to install, configure and test the Webcam. Also, you will have to start the webcam at boot so that you don’t have to run the script manually.
Dagu Mini Pan and Tilt Kit
This kit is what controls the direction of the camera. You should be able to procure something similar locally. If not, you can get it here for USD 15.
Assembly
I will not be discussing how to assemble the rover as this has already been discussed in the previous article. I will only discuss the electronics aspect of the project. The Arduino motor shield is mounted on top of the Arduino YUN. Power to the motor shield is provided by a set of 6 rechargeable batteries. Power to the YUN is provided by a battery bank. In order to stop the motor shield feeding power back into the YUN, I have bent the Vin pin of the motor shield. There are 2 servo motors which are connected to pin A2 and A4. The webcam is connected to USB port of the YUN.
Accessing the Rover over the Internet
The better way to make the Yun web page accessible over the Internet is via Yaler service. You can access the procedure here. Also, add it to startup so that you don’t have to manually run the script. After this, the page should be accessible as http://gsiot-xxxx-xxxx.try.yaler.net/sd/rover. The problem here is that although the control section of the page will be visible but the viewfinder iframe will not be seen because it is not accessible over the Internet. I have put the public ip address of my Internet in the iframe section and done port forwarding on my router for port 8080. I wish there was easier method via Yaler itself.
Sketch and HTML Upload procedure
If you have an sd card in the Yun and an /arduino/www created in the root directory of the sd card, the Yun will automatically transfer the HTML you wrote from your sketch directory to /arduino/www/sketch folder. For example, if my sketch is in \Documents\Arduino\”sketch” folder, I will have to create a folder www in “sketch” directory and have my HTML as index.html. Now when I upload the sketch using wifi, the index.html will be placed in /arduino/www/”sketch”/index.html in the Yun and you can access this page by entering “http://ip address of yun/sd/sketch”. Following is an example video explaining the above procedure
Sample Video
Video Tutorial for accessing Arduino YUN over the Internet
Project Files
You can find the HTML and sketch files here

Hello. This is very nice. I have made a similar bot. It’s listed at http://letsmakerobots.com/robot/project/yun-based-web-controlled-rover. It is still a work in progress.
Do you have these files somewhere retrievable?. I copied the sketch but had to retype it to remove hidden characters
I have added a “Project files” section so you can download from there. The files I have added is a modified version of the one on the page as I keep upgrading it however possible.
hello,
I’m trying to transfer the sketch into the yun, but the foolowing message (‘process’ was not declared in this scope), appears. What should I do ?
I have exactly the same components.Should I include librairies ?
Thank for your feedback, and great job.
Chris
You must have all the 4 libraries installed. If you install yun board in the IDE, you should get the libraries. Whichever process error you are getting, its library has to be present.
Actually I have the 4 librairies.
I forgot to specify that I put only one servo on yun to try.
Remove all reference of the other servo and try. Also try to understand the code and then you might be able to troubleshoot the error.
Hi, I enjoyed reading your post and thanks for sharing. I would appreciate if you could repost or send me the project files as I’m interested in doing something similar.
Regards,
Steve
Hi,
I have updated the link at the end of the post.
Hello.
First off, I want to thank you for this review. It is very informative.
I wanted to ask you for your opinion on a project I am currently working on. Rather than using the arduino yun, I was planning to use an esp8266 and an arducam for livestreaming. The esp8266 would be connected to an arduino uno or mega that would control the motors. Using this setup, is it possible to achieve the same results as your project? What are the pros/cons of this setup? Would I be better off just resorting to an arduino yun?
Best regards: Bardia
Hi,
According to me the Arduino YUN is the most stable microcontroller. No matter how many times you power it Off and ON, it will still work. Raspberry Pi and ESP8266 don’t come close to its stability. If you are able to view an arducam through an esp8266, you can implement what I have but you will require Motor drivers as arduino in itself will not be able to drive the motors.
Thank you so much for your reply. Since the arduino Yun is discountinued, would you recommend the Yun shield plus Leonardo as an alternative? Would the Leonardo still be able to connect to a motor shield after connecting with the yun shield? Are you aware of any sites that still sell the arduino Yun?
Thank you for your time.
Best regards: Bardia
Even if a YUN is available on some site, I think you should look for alternate means as YUN has been retired and you will not get support for it. You can stack multiple shields but you have to see that the pins are not causing conflicts.
Thank you for your help so far.
I have modified my plan to use the Arduino Yun shield and the Leonardo. The only difference in capability between the two is that the Yun Shield can support general bridge class, but it does not support some low level features related to u-boot. Will the different u-boot cause any issues for this project?
Thank you so much for your help so far. Sorry for asking so many questions.
u-boot is related to the firmware and should not matter for project operations.
hi Samirsogay ! You did a perfect works on this robot and I’m trying to duplicate your code on my platform. (my controller is not wiring like yours) I am also try to take it slower with a PID control.
A little question : for the PAN control, who did you receive the value on the arduino side (int value) ? it seems to be the same on TILT.
Cheers from France
Hi,
the “value” variable is local to the function, so the value in pan function is different as compared to the value in tilt function.